Cookie
This website requires cookies to provide all of its features. For more information on what data is contained in the cookies, please see our Privacy Policy page. To accept cookies from this site, please click the Accept button below.

DISCLAIMER - This is a guide only and Tilesporcelain Ltd is not liable for the finished tiling project.

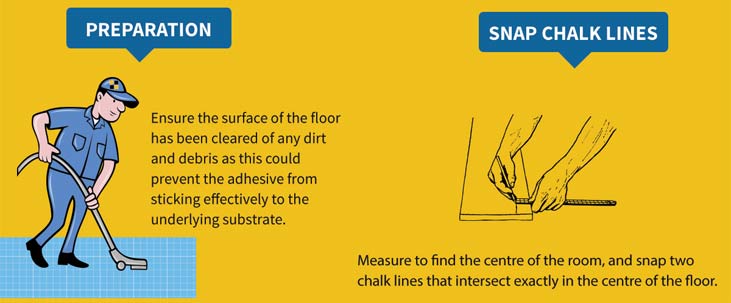
You must firstly prepare the floor surface for tiling before laying a single tile. This includes cleaning the floor which will ensure that the adhesive will stick to the substrate. It is then time to measure the room’s floor so that you can find a point from which to tile from. Using a tape measure and piece of chalk, mark the mid points on the floor of both longer walls as well as both shorter walls. Then draw a line with the chalk from the mark on one of the longer walls to the adjacent wall. Repeat this process with the shorter walls. The floor of the room will now be split into four sections.

Dry lay a row of tiles around the chalk line of one of the sections first to establish which cuts to tiles need to be made. Once you have made the cuts for one section then you will be able to establish roughly what is required for the others. Take into consideration grout lines when making cuts and wear goggles and gloves for safety purposes. Remember that this will only provide you with a general idea of cuts because the walls may be uneven so it is still recommended you should measure each section at a time.


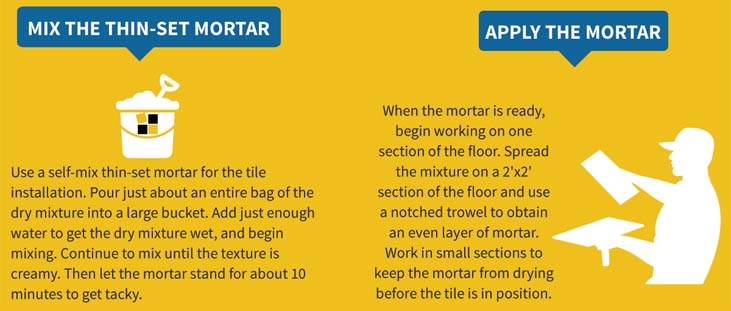
The best mortar for this project is a self-mix, thin-set variety. Always read the instructions on the packet carefully before use. Mix the mortar with the correct ratio of water and wait for the recommended time before it is set. Once the mortar is ready you can then begin to work on one section of the floor. Apply the mortar with the use of a notched trowel to create an even layer. By working in small sections you will ensure that the mortar doesn’t begin to dry before you start laying the tiles.

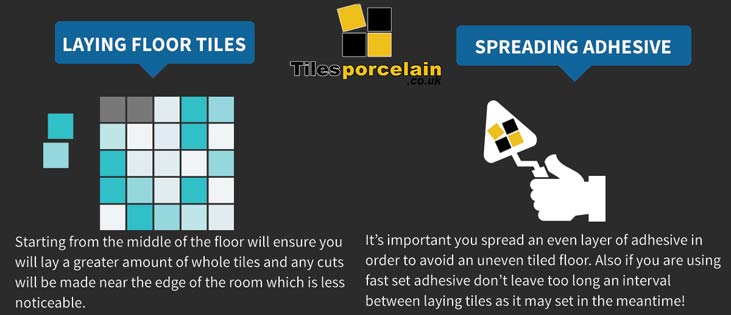
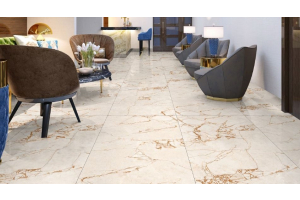
Spread adhesive onto the floor with a trowel into the right angle of one of the sections. Tiling out from the middle will ensure that you use as many whole tiles as possible and you will therefore not have to cut too many tiles Only apply enough adhesive to lay a few tiles at a time to ensure it does not set before you’ve had a chance to lay the tiles on top. Press the tiles down firmly into the bed of adhesive and twist them into place. Use tile spacers to create equal gaps between each tile. Make sure the tiles line-up with the centre lines. Tile one section at a time, beginning at one of the two sections furthest away from the door to avoid blocking yourself in.


Use a spirit level to make sure the tiles are at the same level throughout the floor. Once you have tiled the back half of the room you can then begin working towards the door. Let the adhesive set for a few hours and remove the tile spacers so they do not get stuck. Then leave the adhesive to set for 24 hours. Seal the tiles first before applying grout. Leave the sealant to dry for two or three hours and then fill the gaps with grout using a grout float. Remove any excess grout with clean water and a sponge and dry with a cloth before applying another coat of sealant.


When more than one or two steps are involved; this becomes a major renovation project. Wooden staircases were never designed to take the additional weight associated with applying a stone tile finish and may flex slightly in use so should only be tiled if sufficiently strong and sturdy. If in doubt, you could seek the opinion of a structural engineer to assess the load bearing characteristics. Ideally you should use tiles that are able to fully cover the step from front to back they don’t have to fit perfectly as the excess can be cut away. Remove carpets, trims and old carpet tacks from the staircase to ensure the wooden risers and treads are in good condition and suitable for tiling ideally they should be stripped bare ready for further preparation. The horizontal wooden treads often have a nose or edge that overlaps the vertical risers on wooden staircases. This will need to be cut flush with the riser using a jigsaw or suitable hand saw then sanded flush before ensuring the staircase is clean ready for boarding. In order to achieve a symmetrical finish place the first tile in the centre of the riser and add tiles to both sides; using a tile spacer between natural stone tiles for the grout lines. Check the width of the edge tiles, adjust as needed then mark the tiles and cut to size. Fit the riser tiles with thin set adhesive and tile spacers for a consistent grout thickness. Cut the tiles to size so that when fitted, the joints can be aligned with those on the risers. If you are forming a nose overhanging the riser slightly then this should also be allowed for. Polishing: The tread tiles will have an exposed front edge which should be prepared to avoid easy chipping and make a more professional finish. The exposed edge should have a 3mm chamfer applied to the top edge using a suitable cutting blade and jig for accuracy before being polished with progressively finer grits starting at 50 grit and working to about 1500 or 3000 grit. If the tread tiles are not being finished flush with the risers but overlapped to form a nose then both exposed front edges should be chamfered Fix the tiles in position using thin set adhesive and ensure tiles align with the riser tiles Allow to set and remove spacers prior to sealing and grouting Sealing with Penetrating Sealer Some natural stone tiles are quite porous and are best sealed to prevent dirt build up and moisture penetration when cleaning. Make sure to prepare the sealer according to the manufacturer’s instructions and apply to the exposed surfaces without flooding the tile edge which may cause problems when grouting

Starting at the top step: The cement backing board provides a suitable substrate for tiling on top of wood and should be fitted to the riser and step prior to tiling. Cut sections of backing board to fit the riser and step; leaving a slight gap either side. Apply a layer of thin set of adhesive – This is primarily to act as a filler to prevent voids below the board. Fix the boards into place using suitable countersunk wood screws. From this point onwards the treatment is the same for wooden stairs and concrete steps. Steps should be completed in sequence starting at the top step.

Again starting at the top of the staircase; apply grout to the joints making sure to fully penetrate the gaps Remove excess grout using a soft scraper and wipe the surface clean with a cloth Allow the grout to cure and clean the staircase thoroughly If you are concerned about fitting smooth, polished tiles on staircases; it is possible to create an anti-slip finish by adding grooves near the leading edge of the treads using a jig and diamond saw to provide additional grip